
For what DHCP stands for?
DHCP stands for Dynamic Host Configuration Protocol, and it was the protocol that we’ve used when installing CentOS 7 to get all the IP Addressing settings automatically, you probably remember the step where we activated the Network, if not you can take a look here.
What is IP Addressing?
IP Addressing is the process through which a computer receives all the settings needed to be part of a network and consequently to be able to communicate with other devices, these parameters are listed below.
- IP Address
- Subnet Mask
- Default Gateway
- DNS (Domain Name Server)
A router, a switch, or at home the ISP (Internet Service Provider) device (modem) will dictate the IP addressing for all the devices joining the network.
How to check the IP Addressing on Windows?
Now that you know what IP Addressing means you can go ahead and check all this information on your Windows machine, you can use the following CLI command and you should get something similar to the following screenshot.
ipconfig /all
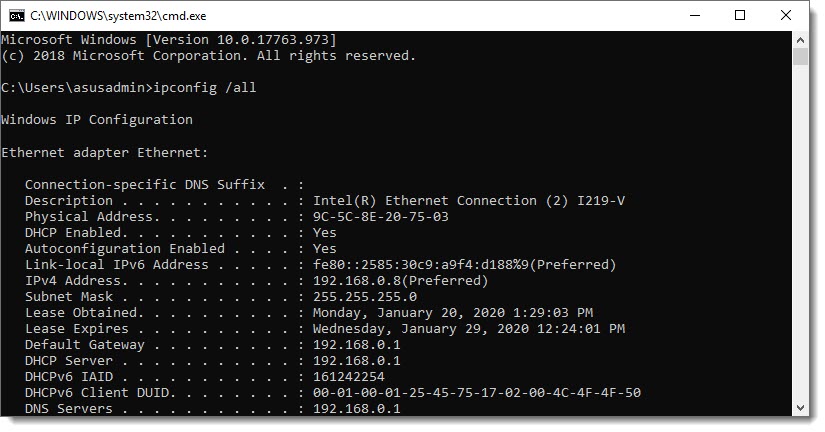
Further in this article we’re going to come back to this screen to double check all the IP Addressing information while manually configuring it for our Linux CentOS 7.
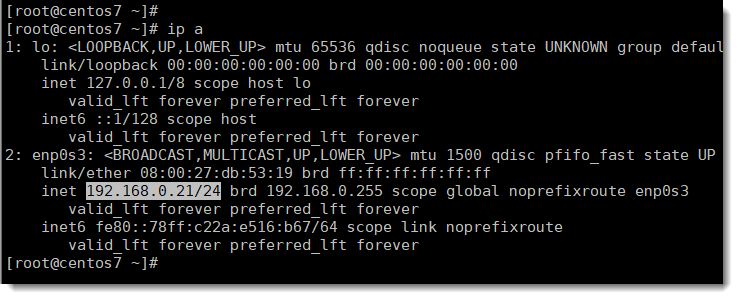
How to check the IP Addressing on CentOS 7?
There are multiple ways to check the IP Addressing on a Linux machine, in my case I always prefer the shortest CLI command I can find, you can take a look at this article to see what I’m talking about.
Manual vs Automatic
For a computer to be able to join a network the physical connection, either wired or wireless and IP Addressing settings, both are mandatory, we have the following two options:
- Manually (we have to configure IP Addressing manually)
- Automatically (allowing DHCP to configure everything for us)
DHCP is the easy one, because the IP Address, Subnet Mask, DNS and Default Gateway, all of them will be assigned automatically, the other one requieres basic knowledge of computer’s networks and is mostly used by power users which prefer to configure everything manually.
Using DHCP when installing CentOS 7
In order to make our life a little bit easy we’ve used DHCP when we were doing the OS installation, the installation wizard will use DHCP if you decide to activate the network, by default is turned OFF.
We don’t want to worry about IP Addressing at the moment of the installation, the CentOS installation wizard can manage that for us and we can focus on the installation itself.
Bridged Network Adapter
Because the virtual Network Adapter was configured as Bridged Adapter, the adapter will emulate the behavior of our physical adapter, that means it will get all the IP addressing from our local modem provided by our ISP (Internet Service Provider), you should immediately see on the screen the IP address that has been assigned along with the Subnet Mask, Default Route, and DNS, that is the confirmation that DHCP has done its job.
Why we have to disable DHCP?
The “D” on DHCP stands for “Dynamic” and that means that the IP Addresses are assigned to our hosts dynamically, that is not a problem for end user’s machines, but for our server we don’t want the IP Address to be changing after every DHCP lease cycle, what we need is an IP Address that never change and remains always the same.
I know that DNS comes into the scene to give us a helping hand, but most of the times on a LAB environment you don’t count with a DNS, so, it’s better to not rely on something we not always have available.
Another good reason to keep the same IP Address is because, once you’ve configured the IP Address on your Terminal Emulator (SecureCRT, Putty, etc) and also on your preferred file transfer tool (FTP,SFTP,etc) like WinSCP, then you don’t want to comes back and modify the IP Address dynamically every time it changes.
Disabling DHCP on Linux
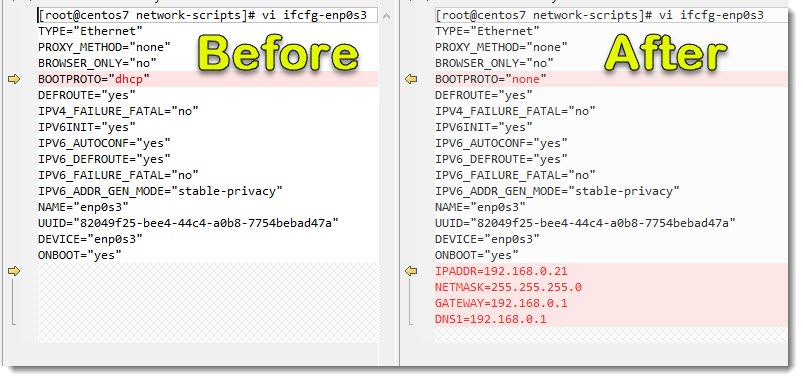
The first time I did disable DHCP on Linux I did use “vi” and to be honest I had to learn first how to use “vi”, the idea now is not to have to learn how to use that tool but instead to take advantage of WinSCP that allow us to modify text files directly from the GUI.
Disabling DHCP as many other things on Linux comes down to modify text files.
The follow image shows the Before and After of the text file we have to modify in order to disable DHCP on our Linux CentOS 7.
Where to go next?
We did a brief theoretical review of DHCP and how it was used on our particular case and now we are ready to get our hands dirty actually doing the task.