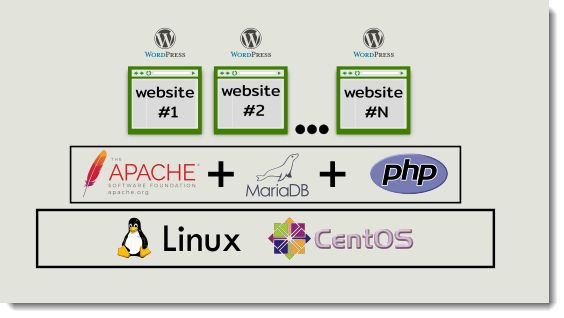
Vi and Vim

The Linux’s users preferred text editor

Vi vs Vim

When it comes to text editors in Linux, the standard is “vi”, it’s a little bit challenging to learn how to use it, but once you get used to it you won’t change it for any other.

The main big advantage of “vi” is that it comes already installed on every Linux distrubution you may use, even when using the minimal ISO file when installing the OS.

VIM is the enhanced version of “vi”, its name actually comes from Vi iMproved

Command mode vs Insert Mode

The most confusing aspect of “vi” editor is that it has two quite distinct ways of working, they are usually referred as modes:

  • COMMAND MODE (default mode)
  • INSERT MODE (type “i” to enter into Insert Mode, and press ESC to quit)

If you want to type a command, you’ll have to first be absolutely sure you are in the “Command Mode” and the same for text, if you want to type/change/delete text, first you must be sure you are in the right mode of operation.

Commonly used “vi” commands

  • i – to switch from Command Mode to Insert Mode
  • D – to delete from the cursor to the end of the line
  • :w – to write (save) your text to a file
  • :wq! – to save and exit “vi”
  • / (slash) – to search for a pattern using a regular expression
  • Ctrl + Shift + V – to paste from the clipboard
  • Show line numbers for current user (~)
    vi ~/.vimrc
    paste the following two words
    set number
    write and quit
  • Go to X line, just enter the line number preceded with colon(:)
    :79
    Another way to do the same is using “gg” (press ESC to be sure you are in command mode)
    79gg
    Or even better, if you know which line to go before opening the file
    vim +79 apache2.conf
  • Move cursor to end of file
    press the Esc key and then press Shift + G to move cursor to end of file

How to install VIM

  • yum install vim

VIM version

Adding a new alias

You don’t have to type “vim” now that you’ve installed it, what you can do instead is to create an “alias” to map “vi” with “vim” that way you’ll be using “vim” every time you type “vi”.

Type “alias” and press “Enter” to see the list of alias

Removing an undesired alias

Removing an undesired alias is quite simple as well, just type “unalias” followed by the alias name.

Set alias globally

You may decide to set an alias and make it globally available, in that case you must modify the “.bashrc” file, you probably noticed this file starts with a period, that means this is a system hidden file.

After making changes to file you need to reload the file, to make the changes available by executing following command:

VIM Sintax Highlight and Color Scheme

Another big advantage of VIM is to be able to turn on/off the sintax color feature, and even more than that, you can also choose the color scheme of your preference

How to list available Color Schemes

  • ls -l /usr/share/vim/vim*/colors/

Temporary enable Syntax Highlight

Just as an example lets open the file “vim.sh” located in the folder /etc/profile.d/

  • vi /etc/profile.d/vim.sh

Open a file with “vi” and then type “:syntax on”

  • :syntax on

If you don’t like what you see, you can just turn it off

  • :syntax off

Change Color Scheme

Changing the “color scheme” is really easy, just type “:color scheme” followed by the scheme name.

Another example:

Permanently change Syntax ON/OFF

Once you’ve decided the color scheme of your preference you can set it permanently, in order to do that you must define both Syntax on and Color inside the “vimrc” file, so, where is located that file, let’s use the “find” command:

Open the file using, for example “less”

Search for the word “syntax” using the forward slash “/”

Once you find the word “syntax” see if it’s followed by the word “on” or “off”.